Topic 2 - ROS and point clouds
Goals of the Class
In this class, you will use ROS2 (Robot Operating System 2) to perform 2D SLAM (Simultaneous Localization and Mapping) and AMCL (Adaptive Monte Carlo Localization) with a simulated Turtlebot3 robot. Moreover, you will map the real 3D environment using data recorded from 3D LIDAR sensor. You will:
- Generate a 2D map of the robot’s environment using LIDAR.
- Enable the robot to navigate autonomously within this known map.
- Extend your skills to 3D localization by creating a 3D map using a laser scanner and the lidarslam package.
Before You Begin
To complete the exercises, you’ll need two Docker images:
arm/lab03 (for 2D SLAM and navigation) and
arm/lab06 (for 3D SLAM). These images contain
pre-configured ROS2 environments with all required tools and
dependencies.
Check and Download Docker Images
Verify if the images are already on your computer:
docker imagesLook for arm/lab03 and arm/lab06 in the
output.
If they’re missing, download them:
For arm/lab03:
wget --content-disposition --no-check-certificate https://chmura.put.poznan.pl/s/pszNFePmGXxu1XX/downloadFor arm/lab06:
wget --content-disposition --no-check-certificate https://chmura.put.poznan.pl/s/B1td9ifRL1S0js9/downloadLoad the downloaded .tar.gz files into Docker:
docker load < path/to/file.tar.gzROS2 Introduction / Recap

The Robot Operating System (ROS) is a set of open-source development libraries and tools for building robotic applications. We will use one of the latest stable versions of ROS2, Humble Hawksbill.
Key ROS2 Concepts
Here’s a breakdown of essential terms:
- Nodes: Small, independent programs that perform specific tasks (e.g., reading a sensor or moving a motor). Nodes communicate within a ROS graph, a network showing how they exchange data.
- Topics: Channels where nodes send and receive data
using a publish/subscribe model. For example, a node might publish a
robot’s position to the
/robot/positiontopic, while another subscribes to display it. - Messages: Structured data sent over topics, defined
in
.msgfiles (e.g.,geometry_msgs/msg/Twistfor velocity commands).

ROS2 Environment (Workspace)
A ROS environment is the place where packages are stored, e.g. for a particular robot. There can be many different environments on one computer (e.g. ros2_robotA_ws, ros2_robotB_ws). A typical workspace looks like this:
ros2_ws
├── build/    # Temporary files for building packages
├── install/  # Compiled packages ready to use
├── log/      # Build process logs
└── src/      # Your source code and packages
Building the Workspace
Use the colcon
tool to build the workspace:
cd ros2_ws
colcon build
Activating the Workspace
After building, “source” the environment to access your packages in the terminal:
source install/setup.bashNote: Run this command in every new terminal session to work with your workspace.
Node Operations
Starting nodes is done via the command:
ros2 run package_name node_nameIt is possible to group nodes allowing them to be run collectively.
The launch files are used for this. Invoking an existing
launch file is done by the command:
ros2 launch package_name launch_nameTopic Operations
Viewing the current list of topics is done using the command:
ros2 topic listReading messages from the topic:
ros2 topic echo topic_nameA single topic can have multiple publishers as well as subscribers. Information about them, as well as the type of message being exchanged, can be checked with the command:
ros2 topic info topic_nameIt is also possible to publish messages on a topic from the terminal:
ros2 topic pub topic_name message_type 'message_data'Useful Tools
- RViz: A 3D visualization tool to display sensor data and robot models:
rviz2

- Gazebo: A simulation environment to create a working environment for your robot and simulate its interaction with objects:
gazebo

ROS2 Bag: Recording and Playback
ROS2 Bag lets you record and replay topic data, useful for testing without a live robot:
- Record:
ros2 bag record /topic1 /topic2 - Play:
ros2 bag play bag_name -r 0.5(half speed) - Info:
ros2 bag info bag_name
Multi-Computer Setup
Nodes in the same domain can freely detect and send messages to each
other. All ROS2 nodes use domain ID 0 by default. Within the laboratory,
it is necessary to set a separate unique domain ID for each
computer to avoid interference. To do this, read the number
from the sticker stuck to the monitor and substitute it in the following
command in place of NR_COMPUTER. If there is no sticker on
your computer, select a number between 0-101 or 215-232.
grep -q ^'export ROS_DOMAIN_ID=' ~/.bashrc || echo 'export ROS_DOMAIN_ID=NR_COMPUTER' >> ~/.bashrc
source ~/.bashrc
Part 1: 2D Point Cloud SLAM and Navigation in a Simple Environment
In this part, you’ll use a simulated Turtlebot3 to build a 2D map with SLAM and localize it within a known map with AMCL.
Key Concepts
- SLAM (Simultaneous Localization and Mapping): A technique where a robot builds a map of an unknown area while tracking its position. Here, we will use Cartographer, a Google-developed SLAM system that localizes and creates maps from LIDAR data. It uses scan matching to estimate relative motion between consecutive point clouds and refines the localization estimates using pose graph optimization.

- AMCL (Adaptive Monte Carlo Localization): A method to locate a robot on a known map using particle filter. AMCL represents the robot’s possible positions as a set of particles, where each particle is a hypothesis of the robot’s location with an associated weight reflecting its likelihood. The algorithm updates these particles based on the robot’s motion (using a motion model) and sensor data (using a sensor model), then resamples them to focus on the most probable positions.
- Point Cloud: A collection of points in space
representing the environment’s geometry. They are produced by LIDAR
sensors.
Environment preparation
- Load the Docker Image: Use
arm/lab03(see Before You Begin). - Create a Contrainer:
- only CPU: Download and run run_cpu.sh
- GPU: Download and run run_gpu_nvidia.sh
wget <script_url>
bash run_*.sh
The container is named ARM_03 by default.
- Build the Workspace:
cd /arm_ws
source /opt/ros/humble/setup.bash
colcon build --symlink-install
source install/setup.bashNOTE: You can attach a new terminal to the container using the following command:
docker exec -it ARM_03 bash
IMPORTANT:
Make sure to source the built environment and set the robot model in every terminal inside the container:
source install/setup.bash; export TURTLEBOT3_MODEL=burgerSet the environment variable
ROS_DOMAIN_IDin a container as instructed here.
Building the World Map
- Launch Gazebo Simulation:
export TURTLEBOT3_MODEL=burger
ros2 launch turtlebot3_gazebo turtlebot3_world.launch.py- Run Cartographer SLAM (new terminal):
export TURTLEBOT3_MODEL=burger
source install/setup.bash
ros2 launch turtlebot3_cartographer cartographer.launch.py use_sim_time:=True
RViz will show the map-building process.
- Move the Robot with the
teleopnode for keyboard operation (new terminal):
source install/setup.bash
ros2 run turtlebot3_teleop teleop_keyboard
Then, using the keys w, a, s,
d and x, you need to control the robot so that
the entire “world” map is built.

- Save the Map (new_terminal, while the SLAM and simulation are running):
source install/setup.bash
mkdir maps
ros2 run nav2_map_server map_saver_cli -f /arm_ws/maps/turtlebot3_world_map
This creates a .yaml and .pgm file
representing the map.
- Turn off the Simulation with
Ctrl+Cin all terminals.
Navigating using the map
- Launch Gazebo Simulation:
export TURTLEBOT3_MODEL=burger
ros2 launch turtlebot3_gazebo turtlebot3_world.launch.py- Launch Navigation2 Node with AMCL method (new terminal):
export TURTLEBOT3_MODEL=burger
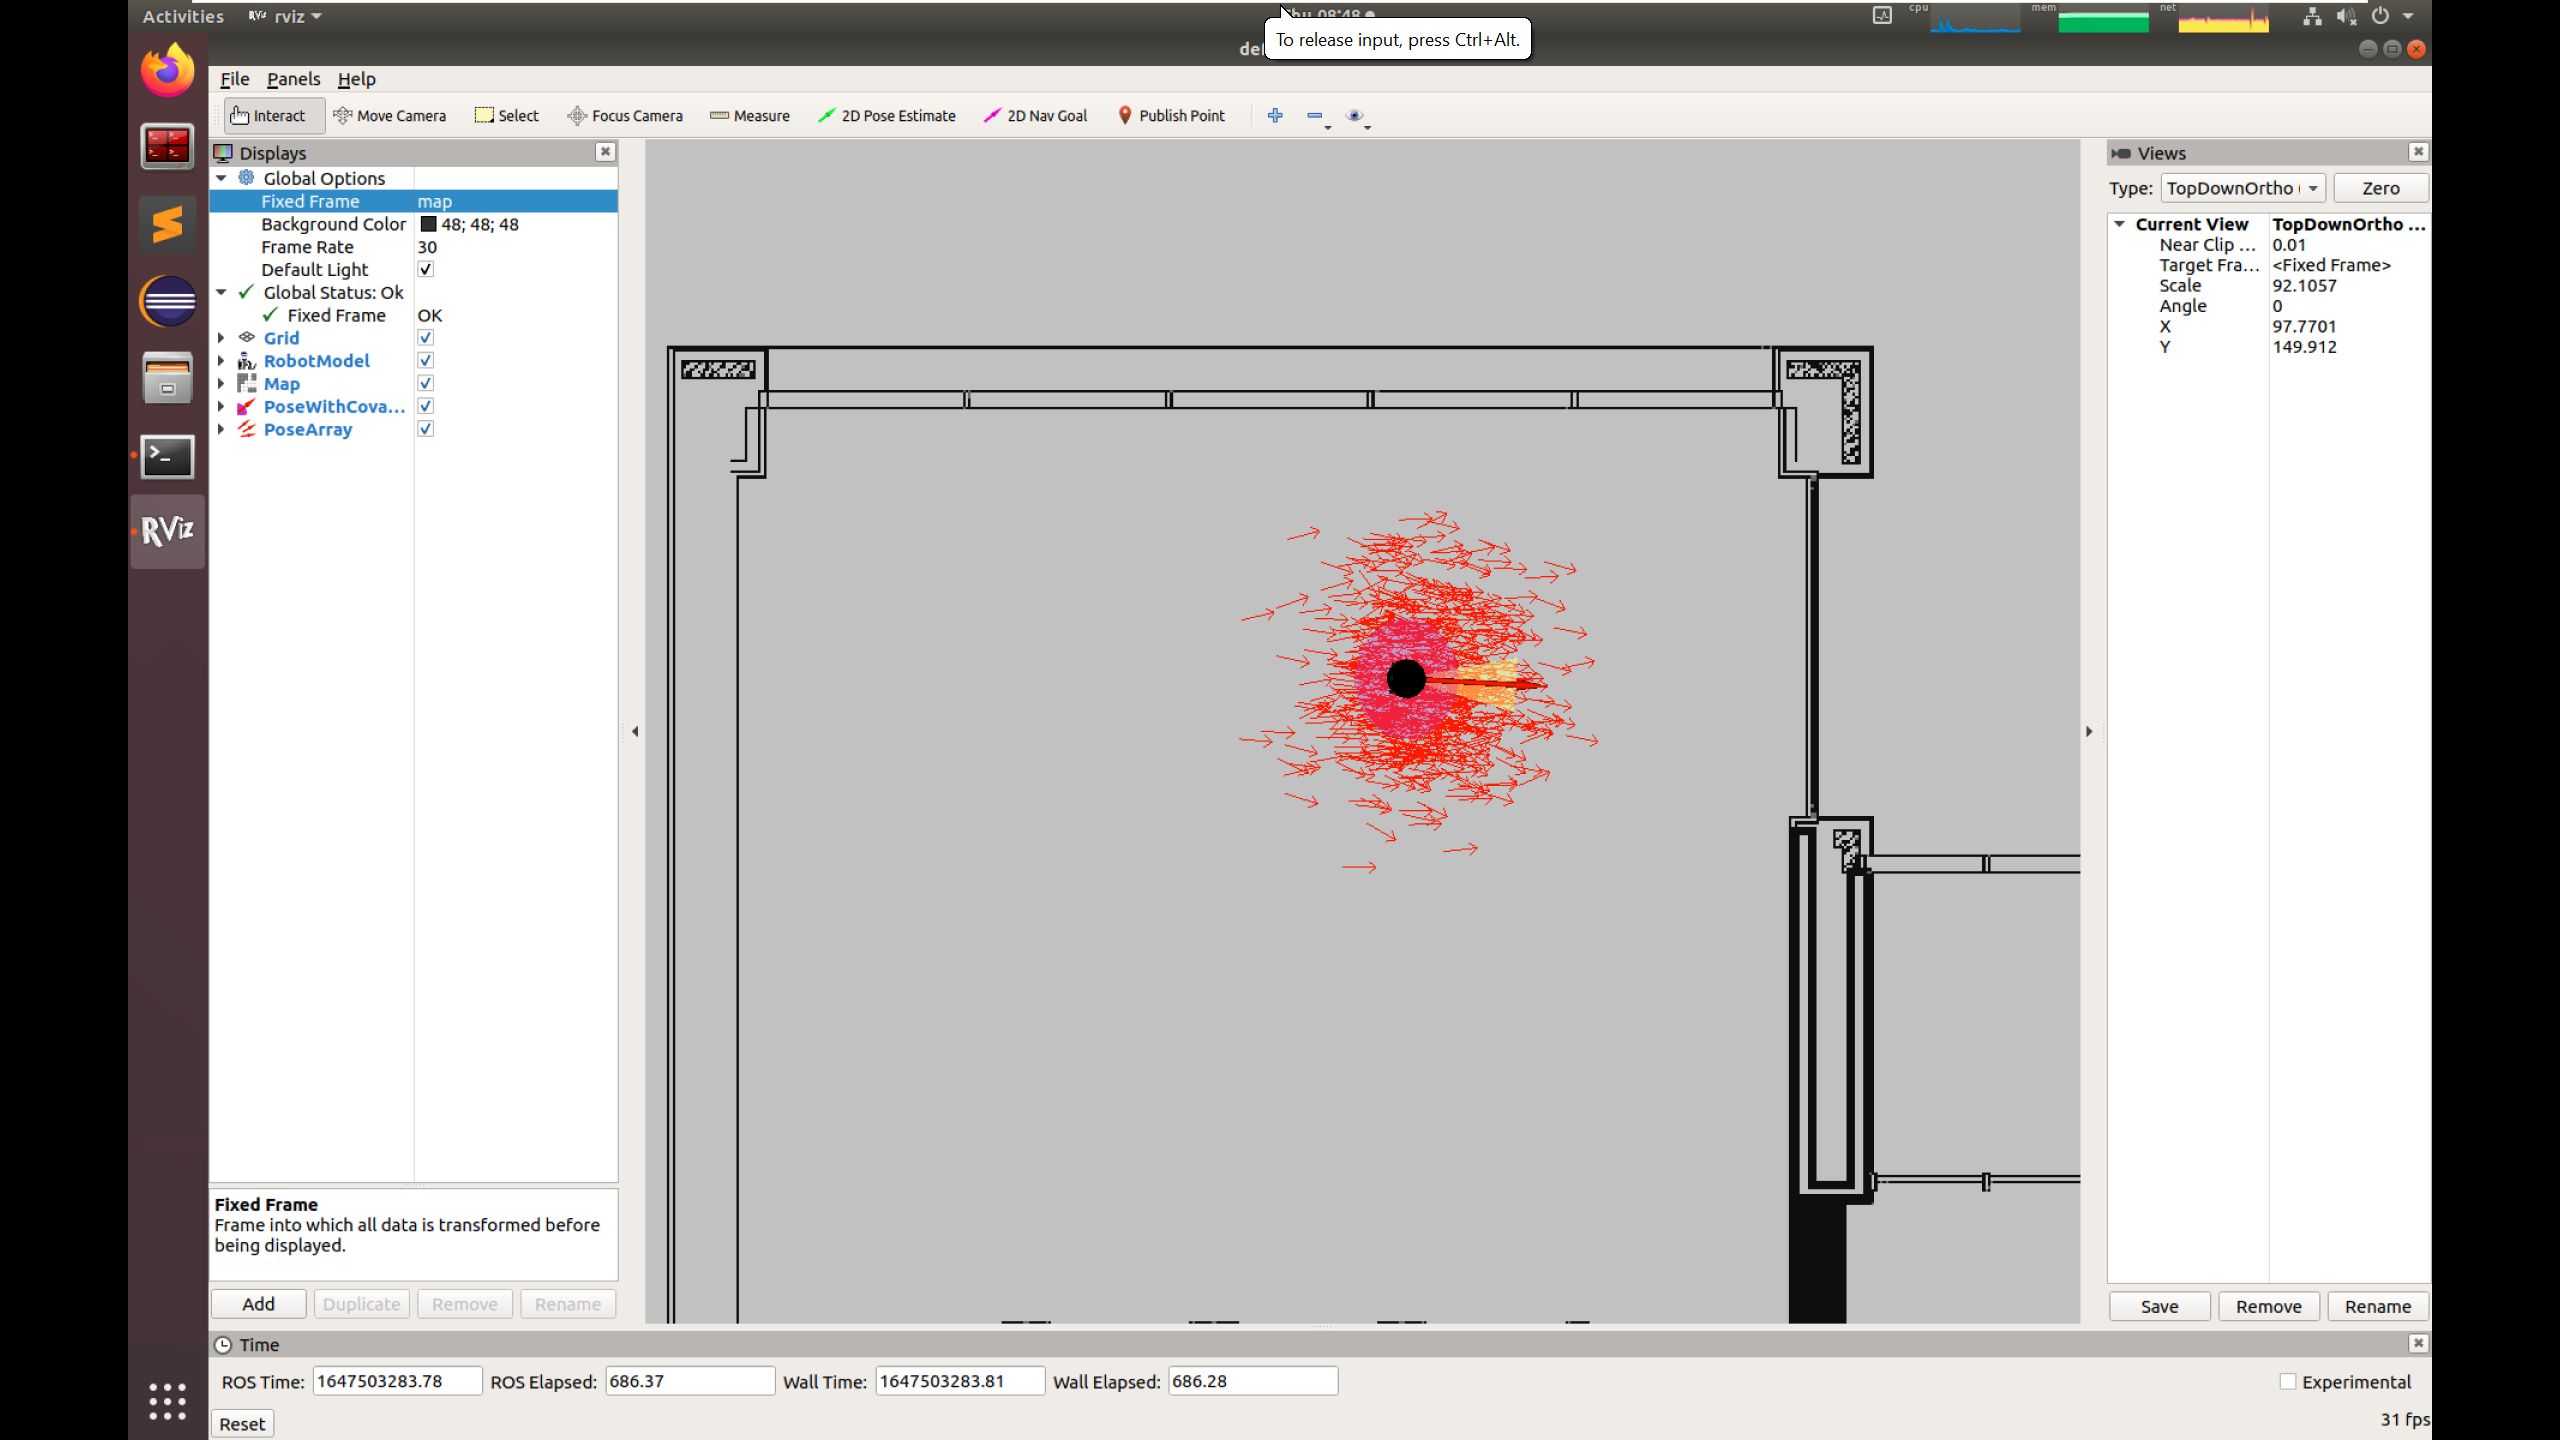
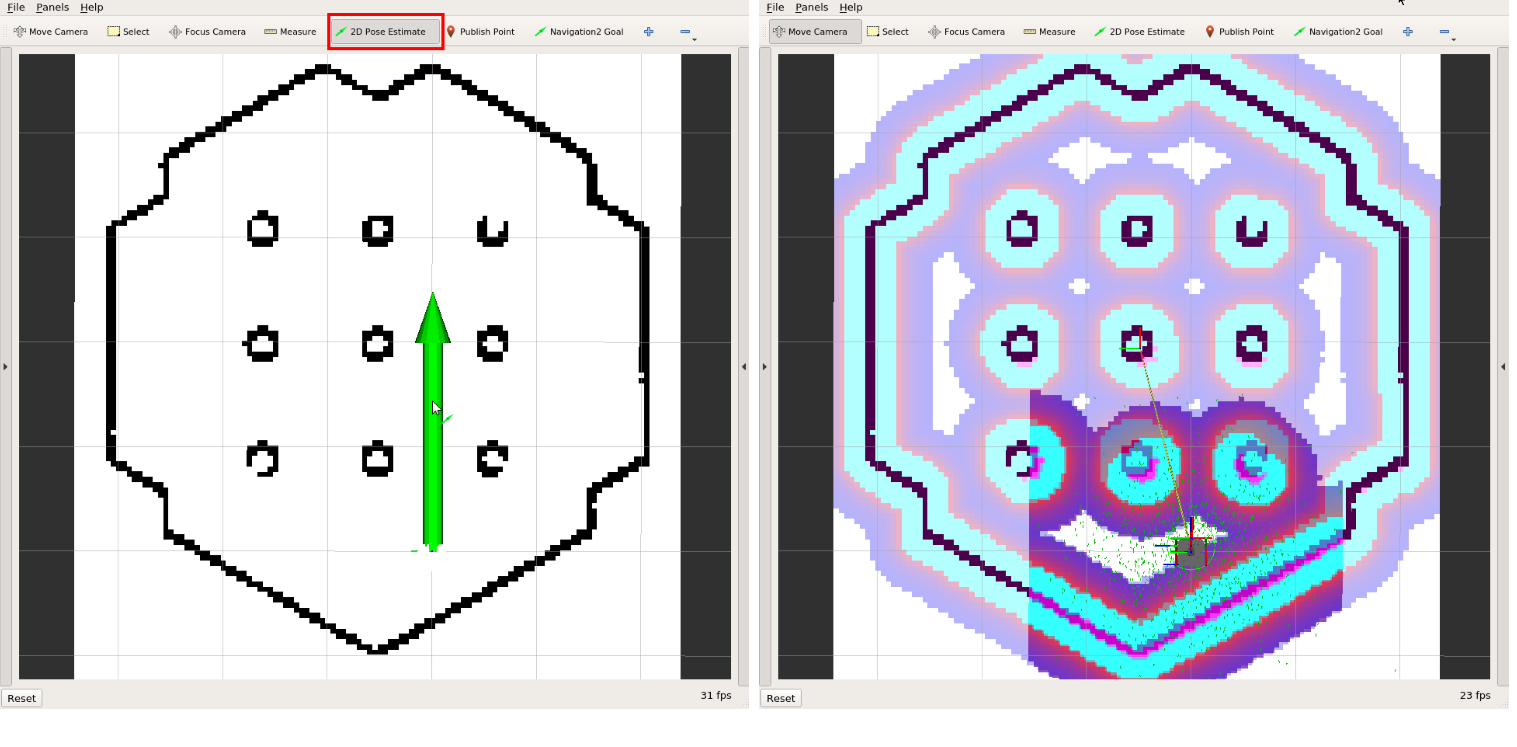
ros2 launch turtlebot3_navigation2 navigation2.launch.py use_sim_time:=True map:=/arm_ws/maps/turtlebot3_world_map.yaml- Set Initial Pose in RViz:
- Click
2D Pose Estimatein the RViz window. - Click on the map in the place where you think the robot is located and drag it in the direction of its front.
- Repeat until the particle cloud aligns with the robot’s actual location.
Before the next step, you can also move the robot back and forth a
bit utilizing previously used teleop node to collect the
surrounding environment information and narrow down the estimated
location of the robot on the map which is displayed with tiny green
arrows.
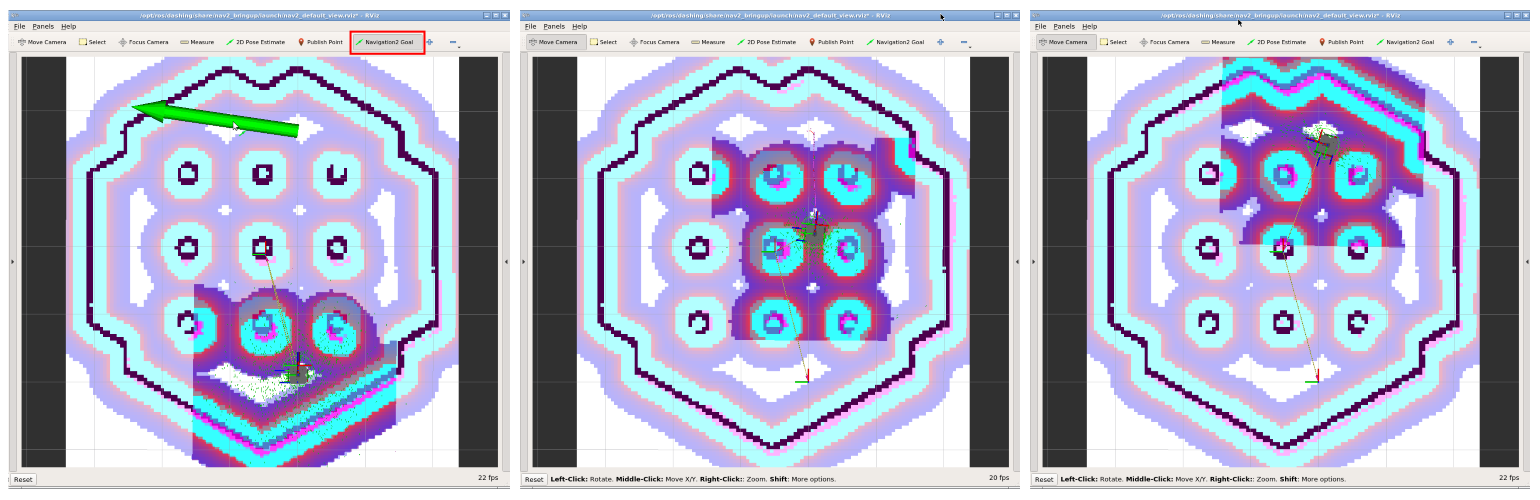
- Set Navigation Goal:
- Click
Navigation Goalin RViz window. - Click and drag to set a destination. The robot will plan and follow a path.
Play with Parameters
In the turtlebot3_navigation2 package, there is a config
file
/arm_ws/src/turtlebot3/turtlebot3_navigation2/param/burger.yaml.
You can verify how the modification of the following parameters affect
the AMCL module operation:
laser_max_rangeandlaser_min_rangemax_beamsmax_particlesresample_intervalupdate_min_aandupdate_min_d
Install you favorite editor if needed, e.g.:
apt update
apt install vim
Part 2: 3D Point Cloud SLAM
Now, you’ll use lidarslam to build a 3D map from LIDAR data and analyze its performance.
lidarslam: A ROS2 package for 3D SLAM using point clouds. It uses scan matching method to calculate the relative transformation between consecutive LIDAR scans to get the initial estimate of the motion (i.e., Normal Distributions Transform (NDT) by default). Moreover, it refines the intial pose estimates and ensures long-term consistency of the map by graph-based pose optimization. It includes loop closure mechanism.
Loop closure is a technique in SLAM where the system recognizes when the robot has returned to a previously visited location. When a loop closure is detected, the system can correct accumulated drift errors by adjusting the entire trajectory and map. This results in a more accurate and consistent map, especially for long trajectories where odometry errors would otherwise accumulate.

Environment Preparation
- Load the Docker Image: Use
arm/lab06(see Before You Begin). - Create a Container:
- only CPU: Download and run run_cpu.sh
- GPU: Download and run run_gpu_nvidia.sh
wget <script_url>
bash run_*.sh
The container is named ARM_06 by default.
- Build the Workspace:
cd /arm_ws
source /opt/ros/humble/setup.bash
colcon build --symlink-install
source install/setup.bashNOTE: You can attach a new terminal to the container using the following command:
docker exec -it ARM_06 bash
Running lidarslam
cd /arm_ws
source install/setup.bash
ros2 launch lidarslam lidarslam.launch.py
RViz window should appear, where the localization and map building process will be visualized.
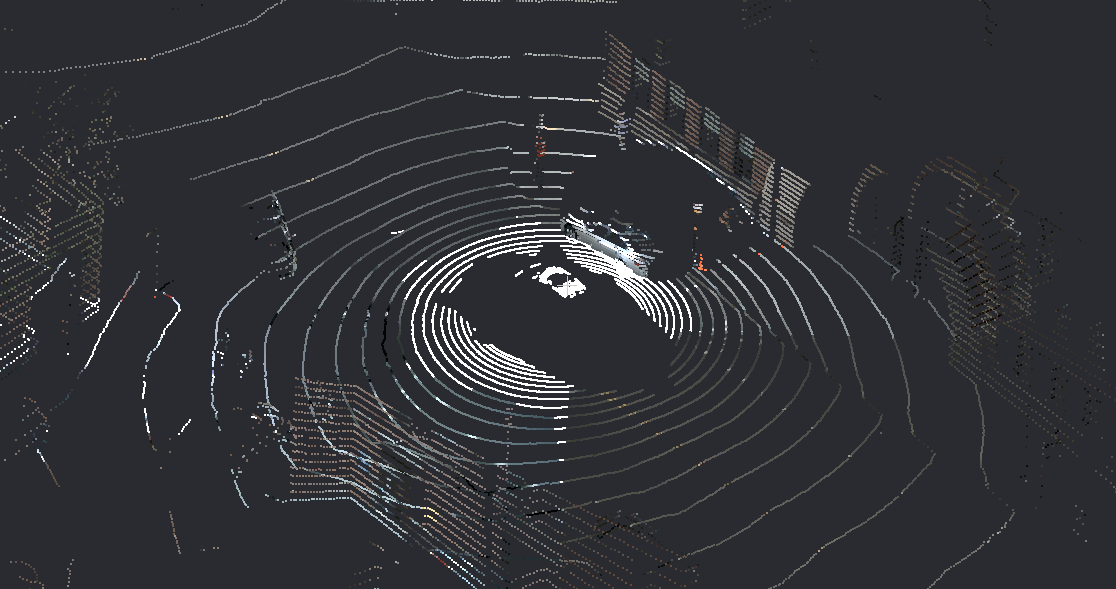
HDL_400
Play back the data recorded using Velodyne VLP-32 LIDAR sensor.
- Play the bag file:
ros2 bag play -p -r 0.5 bags/hdl_400The replay process will start paused and with a rate of
0.5 of the normal speed.
Add a
PointCloud2data type to the visualization from the/velodyne_pointstopic in RViz. It contains the “current” readings from the LIDAR.Unpause the replay process of bag file by using space key in the appropriate terminal.
Observe the difference between maps from
/maptopic (raw map) and/modified_maptopic (optimized map). Similarly observe the difference between/path(yellow) and/modified_path(green) topics. Unfortunately, there is no ground truth localization for this data, but you can see the map optimization process based on loop closure mechanism.
KITTI 00
A bag file with 200 first scans from the 00 sequence of the KITTI dataset was prepared. The data also contain ground truth localization, which can be used to assess the system performance.
- Restart lidarslam:
ros2 launch lidarslam lidarslam.launch.py- Play the bag file:
ros2 bag play -p bags/kittiAdd a
Pathdata type to the visualization from the/path_gt_lidartopic in RViz. Additionally, change it’s color to distinguish it from different paths (yellow and green).Unpause the replay process of bag file by using space key in the appropriate terminal.
Observe the difference between the
ground truthline and the path returned by SLAM.
You will likely observe that the SLAM algorithm processes data too
slowly, resulting in a jagged trajectory that is significantly shorter
than the ground truth. To verify this, repeat the experiment while
playing the rosbag at a reduced speed (e.g., using the
-r 0.3 argument in the ros2 bag play command).
Play with the parameters
Analyze the lidarslam
documentation and observe the system in operation to verify the impact
of the parameters located in
/arm_ws/src/lidarslam_ros2/lidarslam/param/lidarslam.yaml.
Adjust these parameters to ensure the SLAM system operates somewhat
accurately in real-time:
ndt_resolutiontrans_for_mapupdatevoxel_leaf_sizeloop_detection_periodthreshold_loop_closure_scoredistance_loop_closurerange_of_searching_loop_closuresearch_submap_num